Setup Repo and Create Blog
The Big Idea
You are going to fork and clone the blog repo — this is where your reflections, blog posts, and HTML/CSS practice will live for all of Foundations. By the end of this task you will have a working blog running on your computer.
Your Roadmap
| Section | Time | Required? |
|---|---|---|
| Fork the blog repo | 5 min | ⚑ Required |
| Clone it to your computer | 5 min | ⚑ Required |
| Open and run the site | 5 min | ⚑ Required |
| Commit and push | 5 min | ⚑ Required |
| Reflect | 15 min | ⚑ Required |
What the blog is for
- Practising your Git workflow
- Storing your reflections and blog posts
- Practising HTML, CSS, and JavaScript
The goal is a functional site — not a beautiful one. All links should work. It should not break on a phone. Do not spend hours on design. Move forward.
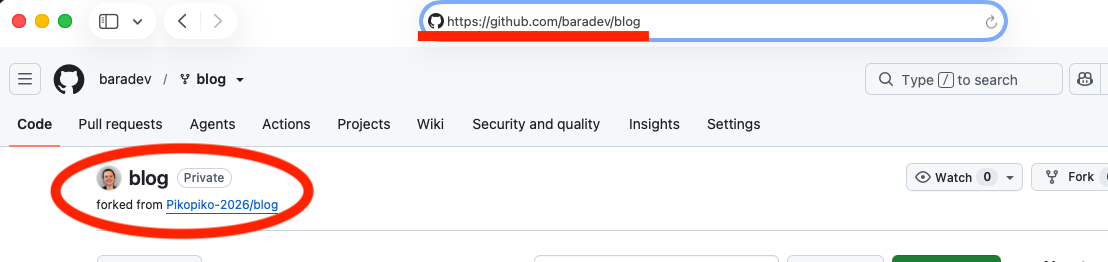
Fork the blog repo
- Go to your cohort's blog repo: blog — select your cohort in the top-right corner of this page to see the link
- Click Fork in the top right corner
- Select your own account as the destination
Your fork will live at https://github.com/YOUR-USERNAME/blog.
Figure 1: Fork the repo from the original
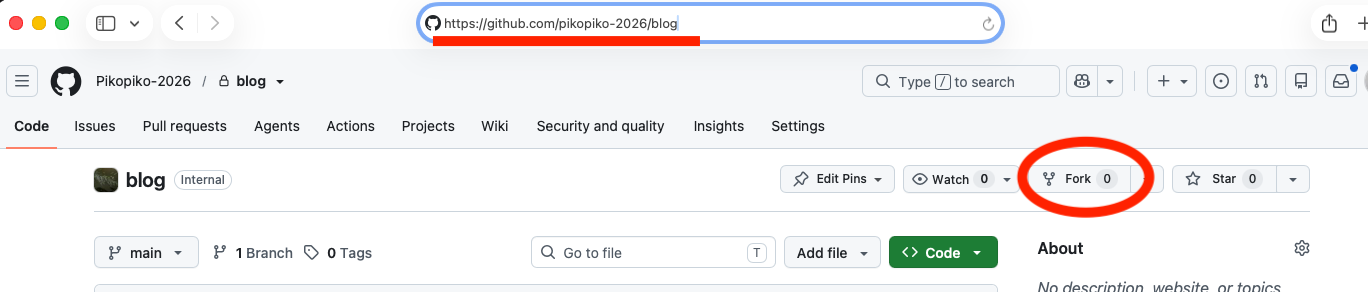
Figure 2: Your forked repo on your account
Clone it to your computer
Do not clone inside an existing Git repo. Clone into your Dev-Academy parent folder:
Dev-Academy/reflections/ko-wai-koe/blog/ ← here
In your terminal:
cd Dev-Academygit clone git@github.com:YOUR-USERNAME/blog.gitcd blog
Open and run the site
Open in VS Code:
code .
Start the website (local server):
npx vite
Open http://localhost:5173 in your browser. You should see the starter page.
The repo starts with one file — index.html:
Don't worry if this looks unfamiliar — you haven't learned HTML yet and that's fine. You'll cover it in the next section. For now, just have a look and get a feel for what's there.
<html><head><title>My blog</title></head><body><h1>Kia ora Taiao! (Hello World!)</h1><p>This is the beginning of my website home page.</p><p>It will eventually contain a list of links to all my blogs.</p></body></html>
Feel free to change the text. Leave the structure as is for now.
Commit and push
git add -Agit commit -m "Set up blog repo"git push
Check your repo on GitHub — your changes should be there.
How to know you've nailed it
| Level | You can... | ||
|---|---|---|---|
| 🪨 | Intro Climb | Fork, clone, and open the blog in VS Code | ⚑ Required |
| 🧗 | Core Ascent | Run the site locally and push a commit to GitHub | ⚑ Required |
| 🏔️ | Summit | Explain what each step did and why, without notes | ◎ Optional |
Reflect
Open sprint-1/my-reflections-sprint-1.md in your reflections repo and add your answers under the Setup Repo & Create Blog heading.
Stage, commit, and push your reflection.
The Big Idea (revisited)
Your blog repo is now set up and running locally. This is the foundation everything else builds on — your HTML, CSS, and blog posts will all live here for the rest of Foundations.