HTML & CSS Blog Setup
Learning Competencies
By the end of this primer, you should be able to:
- Understand the purpose of your blog
- Add a blog directory with template HTML
- Link your CSS file to your HTML file
Summary
This sprint is about building your blog using HTML and CSS while honing your GitHub and command line skills. You'll be learning HTML and CSS through online resources and applying what you learn to your blog website.
Time Box
| Activity | Time |
|---|---|
| Setup | 40 minutes |
| Reflect | 10 minutes |
Overview
In the last sprint, you set up your blog. You'll be expanding this with HTML, CSS and JavaScript as you apply your learning throughout the sprints.
Your blog is a practical way to apply your learning and it will go towards your Foundations assessment. Take special note that you will not be judged on your design application. We don't mind what your blog looks like, but rather:
- how you engaged with the material
- the quality of your reflections
- how you identified obstacles and overcame them
- if you can demonstrate an understanding of the concepts and learning objectives; and
- how frequently you engaged and staged commits.
What your Blog is: A space where you demonstrate your skills in problem-solving and reflections.
What your Blog is not: A fancy looking, perfectly put together interface.
We will, however, introduce you to the important aspects of design thinking and hope that you can incorporate those into your blog.
Throughout the sprints, you'll be presented with many ways to learn HTML, CSS, and JS building blocks.
Some of the resources we point you towards will be media-rich with audio and video. Others, like freeCodeCamp, will look more like a code editor and terminal window.
This is your journey, and it is up to you to discern how you learn best.
Our role is to help facilitate your critical thinking: in other words, help you identify and take ownership for where your knowledge gaps are and to assist you in figuring out how to fill those gaps. In web development, your problem-solving skillset is your greatest asset. As a result of this method, the step-by-step instructions (like those below) will become intentionally less detailed as you move through the curriculum.
In all instances, follow the timeboxing prompts, attend the Homegroups/check-ins, keep to the learning objectives, and reflect.
Introduction
- In the previous challenge, you forked a repository called
blog. - In this exercise you will create a
blog-postsdirectory/folder in your repository. - Each sprint, inside the
blog-postsfolder, you will create a new blog post using HTML, CSS, and JavaScript. - Blogs posts will follow the naming convention topic-name.html e.g.
identity-values.htmlandjavascript-basics.html.
Add HTML
This step adds an HTML template as a placeholder.
Pro-tip-1: You can create many common file types (e.g. .html, .css) the same way you create .txt and .md files (hint: touch).
Pro-tip-2: If adding a new file to a new directory, remember to navigate INTO new file directory after making it.
- Navigate to the directory where you saved your
blogrepo - Inside of the
blogdirectory, create a new directory calledblog-posts(hint:mkdir) - Inside of the
blog-postsdirectory, create a filete-houtaewa-template.html(hint:touch). - Open
te-houtaewa-template.htmlin your code editor (hintcode) - Follow this link, then copy and paste the template contents into
te-houtaewa-template.html. - Add and commit your changes with a good commit message
- Push your changes
- Open
te-houtaewa-template.htmlin your web browser to check the page.
- In VS Code, right–click
te-houtaewa-template.htmland select Copy Path. Paste the path into your browser’s address bar and press Enter.
Add CSS
This step setups the directory structure for your CSS.
- Navigate to the directory where you saved your
blogrepo - Inside of the
blogdirectory, create a new directory namedstyles - Inside of the
stylesdirectory, create a new file namedmain.css(this is a standard naming convention, almost all websites have a file namedmain.css).
Link HTML and CSS
Each HTML file needs to be explicitly linked to a CSS file. In this step, you'll remove the placeholder link in your HTML file and link the main.css file you just created.
- Navigate to your
te-houtaewa-template.htmlfile - Replace the placeholder as shown below
Old ...<link href="your-stylesheet-link-here.css" rel="stylesheet" type="text/css" />... New ...<link href="../styles/main.css" rel="stylesheet" type="text/css" />...
If stuck, This video demo's linking CSS to HTML at 5.08
Opening Your Changes in a Browser
You don't need to copy and paste the file path to the browser to view your changes.
Instead, run npx vite from your blog directory, then visit
http://localhost:5173/ in your browser. To view specific pages,
add the file path to the URL (e.g.,
http://localhost:5173/blog-posts/te-houtaewa-template.html).
GitHub
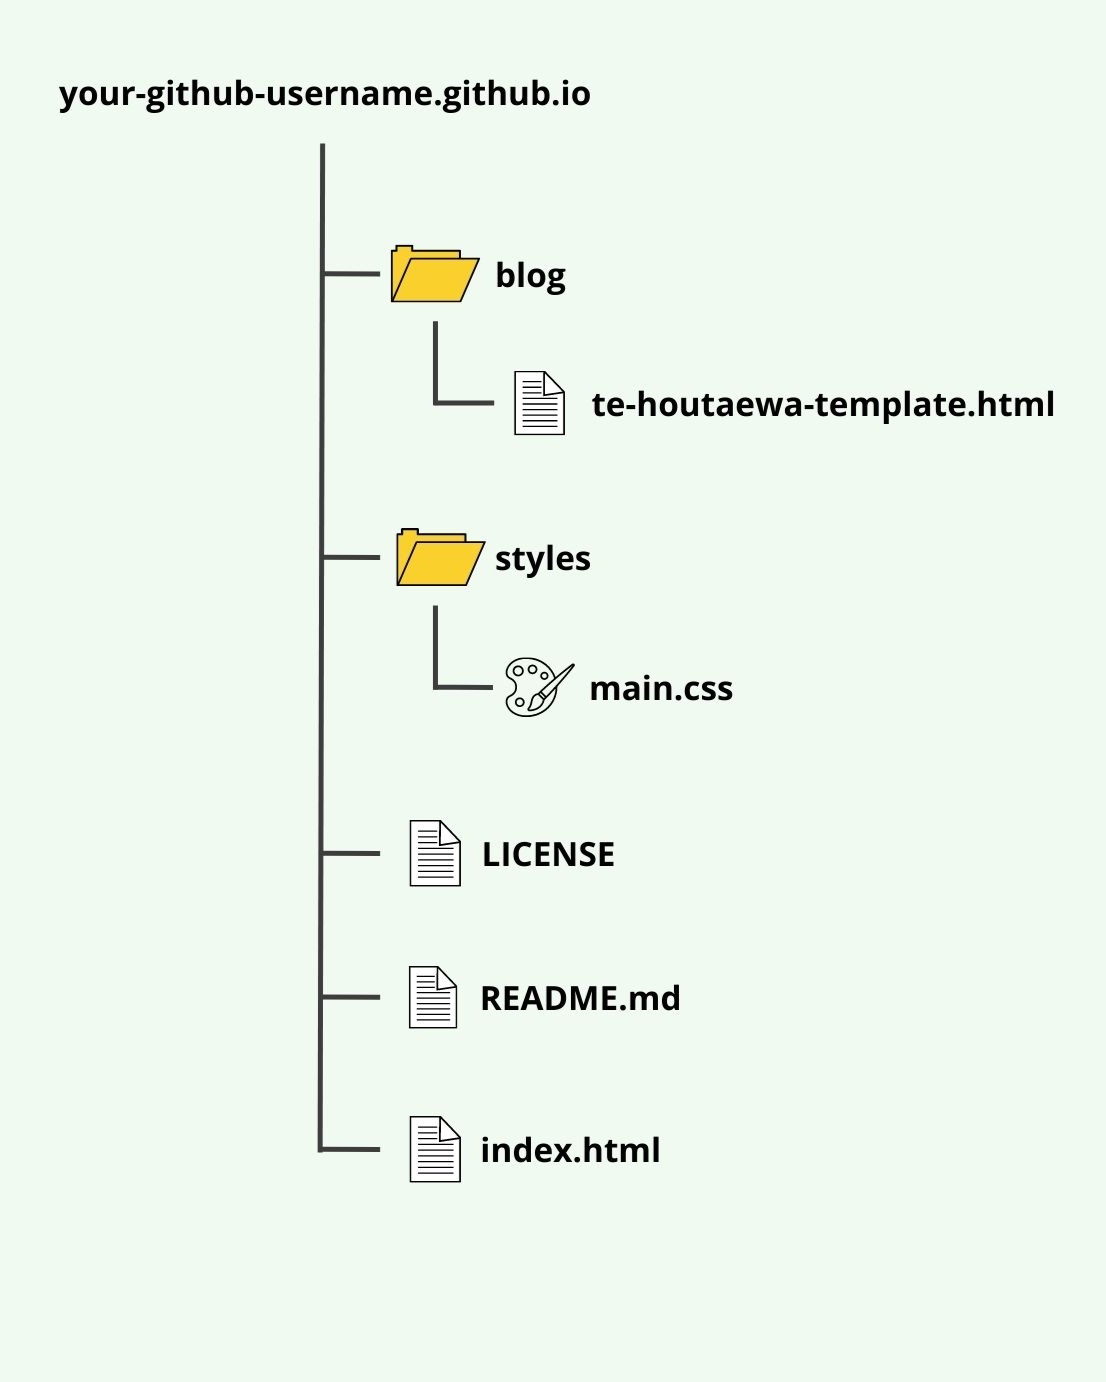
Stage, commit, and push your work to GitHub. Then go to your blog repo and double check it has the structure shown below. If it doesn't, you'll need to change it so it does:
Reflect
Use the terminal to navigate to your my-reflections-sprint-2 file and add your reflections from this challenge. The questions are under the heading Your Blog.
Stage, commit and push to GitHub.