Command Line Primer
Learning Competencies
By the end of this exploration, you should be able to do the following within the command line:
- Identify your location
- Navigate between directories
- Create new and delete existing directories and files
- Open files
Summary
Programmers do not always have pretty ways to interface or test their code. Most spend a good deal of time in their command line (A.K.A. terminal, shell, prompt) - "a tool where you can use text commands to perform specific tasks." When using the command line, you don't slow yourself down by opening a finder and double-clicking on folders. Instead, you navigate around your computer, open, create, delete, move, files, etc., all using commands. It's quick, efficient, and easy once you get the hang of it.
Knowing how to use your command line will be vital to your success as a programmer. You only need to know a few commands for now.
But why is it so important? As you progress through this course, you'll discover that many essential programming tasks can only be done through the command line. When you follow coding tutorials, read documentation, or ask for help online, you'll find that most instructions assume you know basic command line skills. Rather than learning it later when you're already juggling new programming concepts, it's much easier to get comfortable with it now.
Reminder: Github desktop does exist, but don't use it for this course. We work from the command line, and you will need to understand how to use it. By using the command line, you will learn how it functions and how to get the result you want.
Time Box
| Activity | Time |
|---|---|
| See it in action | 15 minutes |
| Give it a try | 45 minutes |
| Explore a little | 20 minutes |
| Reflect | 15 minutes |
Follow the timebox suggestions. We know it's exciting to learn, but trust us, be wise on how deep you go. Let the learning competencies be your guide. Ask yourself if you know them.
Introduction
The purpose of this primer is to introduce you to the command line tool. If you're already familiar with it, check your knowledge against the learning competencies. If you feel confident with each of them, you can jump straight into the Reflection section and/or try the stretch competencies.
Mac, Windows and Linux each come with pre-installed command line tools. If you are on Windows, we ask that you follow the computer set-up guide and use Windows Terminal with Windows Subsystem for Linux (WSL) . This is the command line tool you should use at Dev Academy. If you have a Mac, feel free to use either the Terminal app or iTerm2.
| Operating System | Inbuilt tool | Recommended tool |
|---|---|---|
| Mac | Terminal | Terminal or iTerm2 |
| Windows | cmd and/or PowerShell | Windows Terminal w/WSL |
| Linux/Ubuntu | Terminal | Terminal |
See it in action
Basic terminal usage - Although this video is filmed using a Mac, using the command line in Linux or WSL will be very similar.Learning New Technologies
🛠️ Ask an LLM: "Explain [technology/framework] in simple terms with practical examples. What are the key concepts I should understand first?"
🎯 Why this works: Gets you oriented without overwhelming detail, focuses on fundamentals first.
⚠️ Beware of: Over-reliance on explanations without being able to apply concepts independently.
Understanding Documentation
🛠️ Ask an LLM: "I'm reading the documentation for [tool/library]. Can you break down this section into simpler language: [paste documentation]"
🎯 Why this works: Helps decode dense technical documentation into learnable chunks.
⚠️ Beware of: Avoiding original documentation entirely, which prevents learning to read technical specs independently.
Give it a try
Common commands
Some people memorize many commands for the terminal and even use terminal-based text editor applications (e.g., Vim or Emacs). If you invest enough time in such tools, you can become extremely fast. But it's a significant up-front investment, like learning a musical instrument. There are only a small set of commands you'll need to get started with the terminal. Here are a few to get you started.
pwd
You can use the "print working directory" command, pwd, to see which directory you are currently working in. The terminal always points to a particular directory (folder) in your file system. Often, you'll see an indication of this directory in the "prompt": the text immediately above or to the left of the line you type on. The "prompt" (to prompt you to type) varies depending on how your terminal is set up, but it appears every time it's your turn to type. The simplest prompt is $.
Here's an example of running pwd:
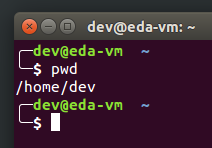
Figure 1: pwd
Notice how the prompt (dev@eda: ~) comes right back again? That's why we call it the prompt. (Uh, not because it comes back quickly, but because it keeps prompting you for input.) Also, notice that after we typed pwd and hit Enter, the terminal responded by outputting the current working directory (/home/dev) to the next line. That's how the terminal works.
Let's try a few more commands:
cd
We can move up or down directories (folders) by calling "change directory" (cd). There are two special names for folders. The single dot . represents the current directory - the one you are in now. The double dot .. represents the parent directory - the one that this directory is in. The "path separator" (between directories) is the /.
So we can move multiple folders at once by stringing them together with /:
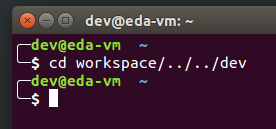
Figure 2: cd
Here we went down into the workspace folder (a sub-folder in the current folder), then back up two folders to the parent of the current folder, and then back into the current folder. That leaves us right back where we started! Why would we do this? We wouldn't. It's pointless.
Nevertheless, there is a point here, which is that we can combine folder names and .. to move all through the folder hierarchy with a single command. Now let's cd into our workspace folder. This is where you'll do all your work for this course. Keep it all here.
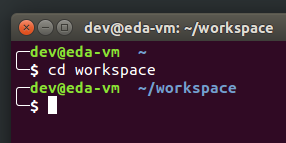
Figure 3: cd workspace
Hey, look! Our prompt has changed. What does all that mean, anyway?
Well, "dev" is our username and "eda" is the name of our computer.
The tilde (~) represents our home folder, in this instance, /home/dev. And we're now in the workspace folder inside our home folder, hence ~/workspace. And the $ is the standard prompt. This will change if we start an application, such as a JavaScript REPL (read, evaluate, print loop), but we'll explain that when we come to it.
ls
What if we want to list the files and folders in this folder? We can do that with the list (ls) command. If we want to see more than just the names, we can add "flags" to the command, preceded with a hyphen. The a flag means "all": show all the files, even the hidden ones (files with names starting with a . are hidden usually). The l flag means use a long listing format, which gives us extra information. We can combine them like this:
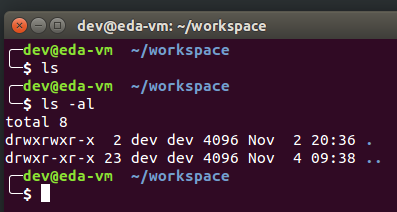
Figure 4: ls and ls -al
Notice that the ls command didn't return anything. That's because our folder is currently empty. But when I use the -a flag, I also see the hidden files and folders (beginning with .). That includes—and it is no accident that these both start with a dot—the current folder . and the parent folder ...
The -l flag also tells the terminal to list more information. So here I see this line for the current folder:
drwxrwxr-x 2 dev dev 4096 Sep 26 22:27 .
This tells me a lot though you don't need to know it all.
- `d' means this is a directory
rwxthe first time means that the owner of this folder has read, write, and execute privileges on itrwxthe second time means that the group to which the owner belongs also has read, write, and execute privilegesr-xmeans that all other users can read or execute but cannot write to this folder2is the number of hard links in the directorydevthe first time is the userdevthe second time is the user's "group."4096is the file size in bytesSep 26 22:27is an indication that the author was doing this at the very last minute.is the name of the folder: the current folder
exit
OK, that's enough for the moment. You'll pick these up quickly as you go along. Google around, and you'll find plenty of cheat sheets of commands. Print one out and keep it handy, or add a bookmark to it in your browser.
Type ' exit ' and hit Enter to get out of the shell (terminal).
Open Visual Studio Code from the Terminal
It is helpful to be able to open files that you are working on directly from the terminal, instead of having to open them through the G.U.I. (graphical user interface).
A common command you will use throughout this course is code . to open the whole folder you've navigated to in the terminal, in VS Code. To open a specific file, for example, a file called my-file-name.md, you can use code my-file-name.md to open it in VS Code.
When VS Code is installed on a Linux system, the code command is automatically added to the terminal. macOS and Windows have different setup methods. Follow the link below and under the heading that matches your machine.
MacOS
When asked to open the Command Palette in VS Code, press Command + Shift + P.
Code For Command Line InstructionsNote for M1 Users
If code is not recognized as a command and attempting to install the code path via the Command Palette in VS Code doesn't work, please try the following:
- Open the Command Palette in VS Code, press Command + Shift + P.
- Uninstall the
codecommand. - Reinstall the
codepath.
Windows
When you install VS Code on your windows laptop/P.C., the code . command is automatically installed for use.
If you encounter errors or issues with running this code, check out this article.
Explore a little more
Have a look for some learning resources: Videos, tutorials, Google. Try keywords like 'Terminal', 'Command Line Basic' and 'cheatsheet'. Have you achieved all of the Learning Competencies?
Reflect
Reflecting is essential for solidifying your learning. It will help you learn how you learn, give opportunities for sharing resources, and will help to demonstrate your knowledge of the learning outcomes.
Reflections are for you, but they will also be read by your facilitator (and some will be published to your blog, which you'll start building later), so make sure to write for an audience. You could aim for a few sentences per prompt/question, though if you would like to reflect further in a learning journal for yourself, feel free!
Keep note of where you keep your reflections as you'll be asked to use them in a later task. Try using your new command line skills to create a directory and/or file for your reflections.
In your reflection file, answer the following questions:
- How would you describe the command line in plain English in a couple of sentences? Can you think of an analogy for it?
- Did you stick to the timebox guidelines? If not, what change would you make next time?
- Name five commands you used and what they do.
- Did you learn anything unexpected?
Stretch
If you have some time remaining, you could try the stretch competencies, or come back to them later. Stretch material is useful but not necessary to move forward. If you're just getting started, don't focus on them for now - try them out when you have spare time.